
 Играете в ветеринара со своей собакой?
 Вы когда-нибудь видели собаку, раненую в драке или сбитую машиной? Возможно, вы могли бы только покачать головой и уйти. Не потому, что вам было все равно, а потому, что вы не знали, как подойти и осмотреть собаку или что делать дальше. Особенно, если у вас есть собственная собака, вам нужно быть готовым, потому что ваша собака зависит от вас в плане помощи в чрезвычайной ситуации.
Эта статья предоставит вам информацию и методы, которые вам понадобятся, чтобы уверенно оказать первую помощь и, возможно, спасти жизнь питомцу. От проведения сердечно-легочной реанимации до лечения укуса насекомого вы узнаете, как справляться с широким спектром неотложных состояний собак.
Давайте начнем с изучения того, как правильно сдерживать обиженную и напуганную собаку, так как это будет первым делом при лечении большинства травм у собак.
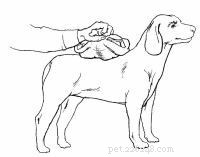
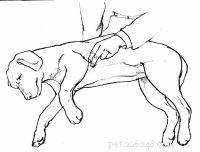
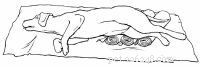
Раненая собака обычно напугана и испытывает боль, и если она не чувствует себя в полной безопасности в вашем присутствии, она может попытаться убежать или даже укусить вас. Поэтому при обращении к раненой собаке важно использовать следующие советы.
Шаг 1: Медленно подойдите к собаке, говоря успокаивающим тоном.
Шаг 2: Подойдите ближе к собаке, не касаясь ее.
Шаг 3: Наклонитесь к собаке. Продолжая говорить, наблюдайте за его глазами и выражением лица.
Шаг 3а: Если у собаки широко раскрыты глаза и она рычит, НЕ пытайтесь ее погладить. Перейдите к шагу 4.
Шаг 3b: Если собака дрожит, с опущенной головой и «улыбающимся» выражением рта, погладьте собаку для успокоения, сначала под челюстью. Если это разрешено, погладьте собаку по голове.
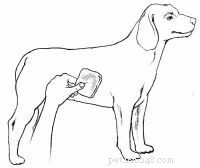
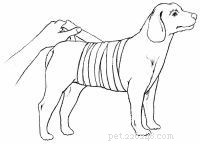
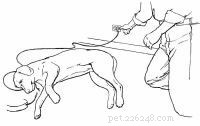
Шаг 4: Наденьте поводок на шею собаки. Используйте любой доступный материал:веревку, галстук, ремень или рваные тряпки.
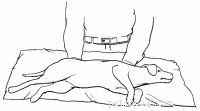
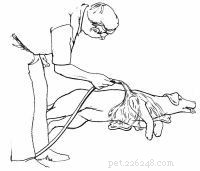
Шаг 5: Если вы один, поместите поводок вокруг неподвижного объекта, например, столба забора. Притяните собаку к этому объекту и привяжите поводок, чтобы собака не могла двигать головой.
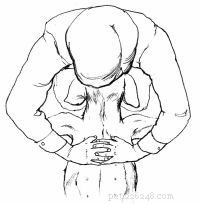
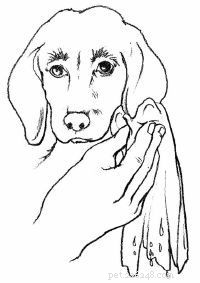
Шаг 6: Наденьте собаке намордник, чтобы защитить себя.
Шаг 6а: С помощью длинного куска веревки, рваных тряпок или галстука наденьте петлю на морду собаки и завяжите один узел под подбородком.
Шаг 6b: Заведите концы веревки, тряпки или завяжите за уши и завяжите их бантиком.
Шаг 7: Если вы один, приступайте к лечению.
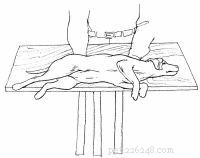
Шаг 8: Если возможно, положите собаку на стол или другую возвышенную поверхность.
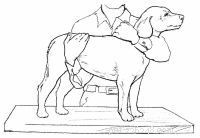
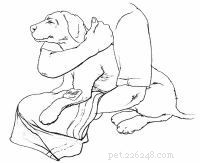
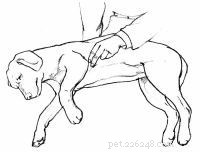
Шаг 8а: Если собака маленькая, одной рукой возьмитесь за ошейник, а другой рукой положите ее на спину и вокруг туловища. В то же время потяните вперед ошейник и приподнимите тело собаки, прижимая ее к себе.
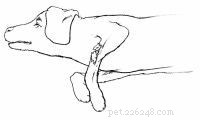
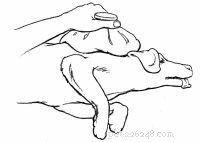
Шаг 8b: Если собака крупная, просуньте одну руку ей под шею, удерживая ее горло на сгибе руки. Убедитесь, что собака может свободно дышать. Поместите другую руку под живот собаки. Поднимите обеими руками.
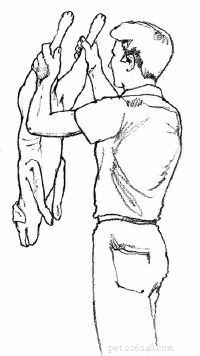
Шаг 8c: Если собака очень крупная, просуньте одну руку ей под шею, держа ее грудь на сгибе руки. Убедитесь, что собака может свободно дышать. Поместите другую руку под круп собаки и, прижав руки друг к другу, поднимите собаку.
Шаг 8г. Пусть ваш ассистент проведет лечение, пока вы держите собаку на столе.
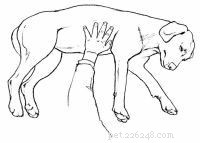
Шаг 9: Если вы хотите, чтобы собака лежала на боку:
Шаг 9а: Встаньте или встаньте на колени так, чтобы собака оказалась перед вами, а ее голова была справа от вас.
Шаг 9b: Перекиньтесь через спину собаки и возьмитесь правой рукой за ближайшую к вам переднюю ногу, а левой рукой за ближайшую к вам заднюю ногу.
Шаг 9c: Отодвиньте лапы собаки от себя и скользите собакой вниз по вашему телу.
Шаг 9г. Возьмите обе передние ноги в правую руку и обе задние в левую руку.
Шаг 9e: Аккуратно придерживайте шею собаки правой рукой.
Шаг 9f: Пусть ваш ассистент проведет лечение.
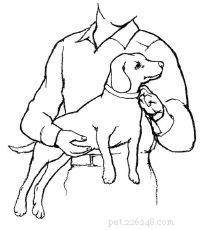
Шаг 10: Если вы хотите, чтобы собака сидела:
Шаг 10а: Просуньте одну руку под шею собаки, держа ее горло на сгибе руки. Убедитесь, что собака может свободно дышать.
Шаг 10b: Положите другую руку на спину собаки и обхватите ее живот.
Шаг 10c: Прижав собаку к себе, перенесите вес тела на заднюю часть тела собаки.
Шаг 10г. Пусть ваш ассистент проведет лечение.
Шаг 11: Если вы хотите, чтобы собака стояла:
Шаг 11а: Просуньте одну руку под шею собаки, держа ее горло на сгибе руки. Убедитесь, что собака может свободно дышать.
Шаг 11b: Поместите другую руку под живот собаки.
Шаг 11c: Прижмите собаку к себе и поднимите вверх.
Шаг 11г. Пусть ваш ассистент проведет лечение.
Умение сдерживать собаку поможет вам практически в любой чрезвычайной ситуации с домашним животным. Теперь давайте посмотрим, как доставить раненую собаку к ветеринару.
Аптечка первой помощиВладельцы домашних животных должны иметь под рукой следующие предметы для экстренных случаев с собакой.
Прочитайте больше
После того, как вы привязали раненую собаку, вам нужно как можно скорее доставить ее к ветеринару. Старайтесь не двигать раненую собаку больше, чем это необходимо, и попросите кого-нибудь позвонить ветеринару, чтобы убедиться, что он или она готовы к вашему приезду. А пока воспользуйтесь следующими советами, которые помогут вам перевозить вашего питомца с максимальной осторожностью.
Шаг 1: Если собака маленькая:
Шаг 1а: Возьмитесь за воротник одной рукой, а другой рукой положите ее на спину и вокруг тела.
Шаг 1b: В то же время потяните вперед ошейник и приподнимите тело собаки, прижимая ее к себе.
Шаг 2: Если собака большая:
Шаг 2а: Просуньте одну руку ему под шею, удерживая его горло на сгибе руки. Убедитесь, что собака может свободно дышать.
Шаг 2b: Поместите другую руку под живот собаки. Поднимите обеими руками.
Шаг 3: Если собака очень крупная, просуньте одну руку ей под шею, держа ее грудь на сгибе руки. Убедитесь, что собака может свободно дышать. Поместите другую руку под круп собаки и, прижав руки друг к другу, поднимите собаку.
Шаг 4: Отвезите собаку к ветеринару.
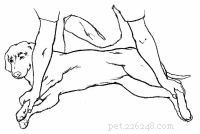
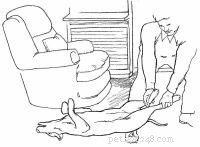
При подозрении на перелом спины необходимо использовать плоскую доску.
Шаг 1: Используйте одеяло или плоскую доску в качестве носилок. Если вы используете доску, перейдите к шагу 2. Если вы используете одеяло:
Шаг 1а: Поместите одну руку под грудь собаки, а другую под ее заднюю часть; осторожно поднимите или переместите собаку на одеяло.
Шаг 1b: Отвезите собаку к ветеринару.
Шаг 2: Если вы используете плоскую доску:
Шаг 2а: В зависимости от размера собаки используйте лист стола, гладильную доску, большую разделочную доску или съемную книжную полку. Убедитесь, что все, что вы используете, поместится в вашем автомобиле.
Шаг 2b: Поместите 2 или 3 длинных полоски ткани или веревки на равном расстоянии под доской, избегая области, где будет располагаться шея собаки.
Шаг 2c: Поместите одну руку под грудь собаки, а другую под ее заднюю часть; осторожно поднимите или задвиньте собаку на доску.
Шаг 2г. Привяжите собаку к доске.
Шаг 2e: Отвезите собаку к ветеринару.
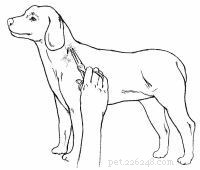
Еще один метод, который может пригодиться во многих ситуациях оказания первой помощи, — это давать пероральные лекарства вашему питомцу. На следующей странице вы найдете несколько полезных советов по приему лекарств.
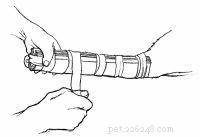
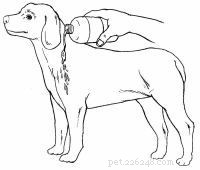
Независимо от того, нужно ли вам дать обезболивающее после серьезной травмы или просто пришло время для ежемесячной таблетки от сердечного червя вашего питомца, полезно знать, как легко давать пероральное лекарство собаке. Используйте следующие советы, чтобы дать собаке жидкие или таблетированные лекарства.
Шаг 1: Сдерживать собаку. Если с собакой трудно справиться, вам может понадобиться помощь, чтобы ее удержать.
Шаг 1а: Снимите тревогу собаки, поговорив с ней тихо и успокаивающе.
Шаг 1b: Просуньте одну руку под шею собаки, осторожно удерживая ее горло на сгибе руки. Убедитесь, что собака может свободно дышать.
Шаг 1c: Проведите другой рукой над или под серединой собаки, мягко, но сильно надавливая, чтобы прижать ее тело к себе.
Шаг 1г: При необходимости наденьте повязку свободно, чтобы челюсть двигалась лишь незначительно.
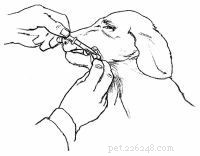
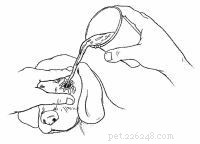
Шаг 2: Аккуратно наклоните голову собаки немного назад.
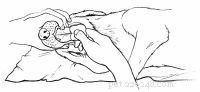
Шаг 3: Вытяните нижнюю губу собаки за угол, чтобы получился мешочек.
Шаг 4: С помощью пластиковой пипетки или дозировочного шприца понемногу добавляйте жидкость в пакет, позволяя проглотить каждое небольшое количество, прежде чем давать следующую дозу.
Шаг 5: Аккуратно потрите горло собаки, чтобы стимулировать глотание.
Шаг 1: Сдерживать собаку. Если с собакой трудно справиться, вам может понадобиться помощь, чтобы ее удержать.
Шаг 1а: Снимите тревогу собаки, поговорив с ней тихо и успокаивающе.
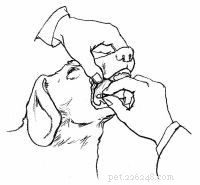
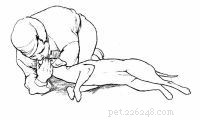
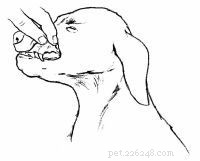
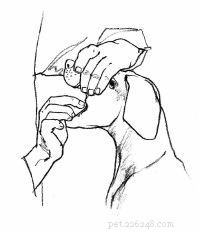
Шаг 2: Возьмитесь одной рукой за верхнюю челюсть собаки над ее мордой.
Шаг 3: Прижмите губы собаки к верхним зубам, нажимая большим пальцем с одной стороны и пальцами с другой, чтобы губы собаки оказались между ее зубами и вашими пальцами. Сильно надавите, чтобы рот открылся.
Шаг 4: Держите таблетку между большим и указательным пальцами другой руки и поместите таблетку как можно дальше в пасть собаки.
Шаг 5: Аккуратно потрите горло собаки, чтобы стимулировать глотание.
Альтернативный метод – спрятать таблетку в сыр, арахисовое масло или другое лакомство.
Кровь на собаке может быть признаком серьезной травмы или просто легкого пореза лапы. В следующем разделе мы обсудим, как определить различные признаки и что делать, чтобы помочь истекающему кровью питомцу.
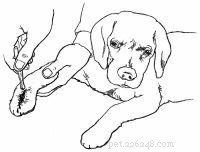
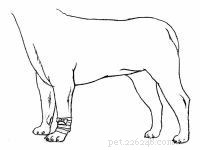
Лапы и ноги собаки уязвимы для травм осколками стекла, гвоздями и другими острыми предметами, и при порезах они сильно кровоточат. Поврежденное ухо также будет сильно кровоточить, потому что кожа над ухом очень тонкая.
При любой кровоточащей травме основной целью оказания первой помощи является предотвращение чрезмерной кровопотери, которая может привести к шоку. Признаки шока включают бледные или белые десны, учащенное сердцебиение или учащенное дыхание. Если из какой-либо раны брызжет кровь, значит, артерия перерезана. Это требует немедленного профессионального вмешательства.
То, как вы ухаживаете за своей собакой, будет зависеть от места и степени кровотечения. Следующие советы по уходу за собакой помогут вам оказать первую помощь на различных участках тела.
Шаг 1: При необходимости привяжите собаку.
Шаг 1а: Медленно подойдите к собаке, говоря успокаивающим тоном.
Шаг 1b: Наденьте поводок на шею собаки, затем наденьте поводок на неподвижный предмет. Притяните собаку к этому объекту и привяжите поводок, чтобы собака не могла двигать головой.
Шаг 1c: Наденьте собаке намордник, чтобы защитить себя.
Шаг 2: Накройте рану стерильной марлевой подушечкой, чистым сложенным полотенцем или гигиенической салфеткой.
Шаг 3: Оберните рваную тряпку или другой мягкий материал вокруг повязки и завяжите или закрепите ее достаточно туго, чтобы повязка оставалась на месте.
Шаг 4: Немедленно доставьте собаку к ветеринару.
Шаг 1: При необходимости привяжите собаку.
Шаг 1а: Медленно подойдите к собаке, говоря успокаивающим тоном.
Шаг 2: Подстригите волосы вокруг поврежденного участка.
Шаг 3: Осмотрите рану на наличие стекла или других посторонних предметов. Если он виден, удалите объект пальцами или пинцетом. Если кажется, что ткань под раной проходит, когда вы перемещаете кожу, на рану, вероятно, потребуются швы.
Шаг 4: Тщательно промойте рану чистой водой. Избегайте домашних антисептиков, которые могут вызвать боль при нанесении.
Шаг 5: Накройте рану чистой тканью, стерильной повязкой или гигиенической салфеткой.
Шаг 6: Положите руку на повязку и плотно прижмите ее.
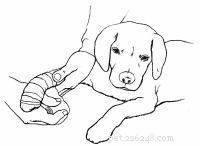
Шаг 7: Продолжайте надавливать на повязку, чтобы остановить кровотечение. Если через повязку просочилась кровь, НЕ снимайте ее. Наложите больше повязки и продолжайте оказывать давление, пока кровотечение не остановится. Если кровотечение не останавливается в течение 5 минут, продолжайте давить на рану во время транспортировки собаки к ветеринару.
Шаг 8: Оберните порванную тряпку или другой мягкий материал вокруг повязки и завяжите или закрепите ее достаточно туго, чтобы повязка оставалась на месте. Начинайте под раной и двигайтесь вверх.
Шаг 9: Если рана настолько глубокая, что требуется наложение швов, не подпускайте собаку к поврежденной лапе и немедленно доставьте питомца к ветеринару.
Шаг 1: При необходимости привяжите собаку.
Шаг 1а: Медленно подойдите к собаке, говоря успокаивающим тоном.
Шаг 1b: Наденьте собаке намордник, чтобы защитить себя.
Шаг 2: Если рана находится в груди и слышен «сосущий» звук, перевяжите рану достаточно туго, чтобы воздух не попал внутрь, и немедленно доставьте собаку к ветеринару. Если нет, перейдите к шагу 3.
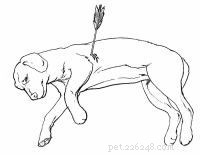
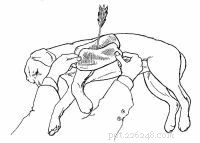
Шаг 3: Если имеется выступающий объект, например стрелка, НЕ ПЫТАЙТЕСЬ удалить этот объект. Если нет, перейдите к шагу 4.
Шаг 3а: Положите чистые ткани, стерильные повязки или гигиенические салфетки вокруг места входа.
Шаг 3b: Плотно перевяжите место входа.
Шаг 3c: Немедленно доставьте собаку к ветеринару.
Шаг 4: Подстригите волосы вокруг поврежденного участка.
Шаг 5: Осмотрите рану на наличие стекла или других посторонних предметов. Если он виден, удалите объект пальцами или пинцетом. Если кажется, что ткань под раной проходит, когда вы перемещаете кожу, на рану, вероятно, потребуются швы.
Шаг 6: Тщательно промойте рану чистой водой.
Шаг 7: Накройте рану чистой тканью, стерильной повязкой или гигиенической салфеткой.
Шаг 8: Положите руку на повязку и плотно прижмите ее.
Шаг 9: Продолжайте надавливать на повязку, чтобы остановить кровотечение. Если через повязку просочилась кровь, НЕ снимайте ее. Наложите еще повязку и продолжайте давить, пока кровотечение не остановится.
Шаг 10: Оберните разорванные листы или другой мягкий материал вокруг повязки и завяжите или закрепите ее достаточно туго, чтобы повязка оставалась на месте.
Шаг 11: Если рана достаточно глубокая и требует наложения швов, немедленно доставьте собаку к ветеринару.
Шаг 1: При необходимости привяжите собаку.
Шаг 1а: Медленно подойдите к собаке, говоря успокаивающим тоном.
Шаг 1b: Наденьте собаке намордник, чтобы защитить себя.
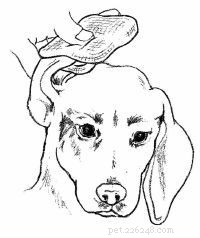
Шаг 2: Накройте рану чистой тканью, стерильной повязкой или гигиенической салфеткой. Поместите перевязочный материал с обеих сторон ушной раковины, затем сложите ее поверх головы собаки и крепко держите, чтобы остановить кровотечение.
Шаг 3: Оберните разорванные простыни или тряпки вокруг повязки, уха и головы, убедившись, что все ухо закрыто. Закрепите или завяжите повязку на месте.
Шаг 4: Немедленно доставьте собаку к ветеринару.
Сломанный или слишком коротко обрезанный ноготь — наиболее распространенная причина кровотечения из ногтя. Обязательно отведите собаку к грумеру, если вам неудобно подстригать ей когти.
Если ноготь сломан:
Шаг 1: При необходимости привяжите собаку.
Шаг 1а: Медленно подойдите к собаке, говоря успокаивающим тоном.
Шаг 2: НЕ пытайтесь срезать или удалить сломанный ноготь, не надев собаке намордник.
Шаг 3: Приложите чистую ткань, стерильную повязку или гигиеническую салфетку к ногтю. Кровотечение остановится через несколько минут.
Шаг 4: Как можно скорее доставьте собаку к ветеринару.
Если ноготь обрезан слишком коротко:
Шаг 1: При необходимости привяжите собаку.
Шаг 1а: Медленно подойдите к собаке, говоря успокаивающим тоном.
Шаг 1b: Наденьте поводок на шею собаки, затем наденьте поводок на неподвижный предмет. Притяните собаку к этому объекту и привяжите поводок, чтобы собака не могла двигать головой.
Шаг 1c: Наденьте собаке намордник, чтобы защитить себя.
Шаг 2: Приложите чистую ткань, стерильную повязку или гигиеническую салфетку к ногтю.
Шаг 3: Держите сильное давление на область в течение по крайней мере 5 минут. НЕ снимайте повязку, пока кровотечение не остановится.
Шаг 4: Если кровотечение не останавливается в течение 15–20 минут, как можно скорее доставьте собаку к ветеринару. Непрерывное кровотечение указывает на нарушение свертываемости крови, которое следует лечить незамедлительно.
Внутреннее кровотечение всегда является неотложным состоянием. Признаки внутреннего кровотечения — бледные или белые десны; быстрое сердцебиение или дыхание; и кровотечение из ушей, носа, рта или прямой кишки. Следующие шаги помогут вам вылечить собаку от любого потенциального шока и немедленно доставить собаку к профессиональной помощи.
Шаг 1: Если есть кровотечение из каких-либо внешних ран, лечите от шока.
Шаг 1а: Осмотрите десны, осторожно приподняв верхнюю губу, чтобы десна была видна. Бледные или белые десны указывают на то, что собака почти наверняка находится в состоянии шока и может иметь серьезные внутренние повреждения и/или кровотечение. Если десны розовые, вероятно, у собаки нет шока.
Шаг 1b: Определить сердцебиение. Крепко положите пальцы на собаку примерно в 2 дюймах от локтя собаки в центре ее груди. Подсчитайте количество ударов за 10 секунд и умножьте на 6. Если собака в шоке, ее сердцебиение может превышать 150 ударов в минуту.
Шаг 2: Положите собаку на бок с вытянутой головой.
Шаг 3: Аккуратно вытяните язык собаки, чтобы дыхательные пути оставались открытыми.
Шаг 4: Немного приподнимите заднюю часть собаки, положив ее на подушку или сложенное полотенце.
Шаг 5: Чтобы сохранить тепло тела, заверните собаку в одеяло или куртку.
Шаг 6: Немедленно доставьте собаку к ветеринару.
Вздутие живота — серьезное заболевание, которое может привести к внезапной смерти собаки. В следующем разделе мы обсудим признаки вздутия живота и что делать, если вы подозреваете, что ваш питомец страдает от него.
Трудно принять тот факт, что, казалось бы, здоровая собака может в течение часа бороться за свою жизнь. Вздутие живота является чрезвычайно серьезным, потенциально смертельным состоянием. Профессиональное лечение необходимо срочно, и его нельзя откладывать.
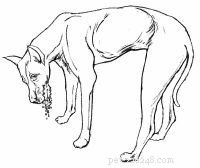
Вздутие живота чаще встречается у крупных собак с глубокой грудью, чем у собак других пород. Симптомы драматичны и безошибочны и включают чрезмерное слюнотечение, хождение взад-вперед и возбуждение; увеличенный живот; и частые попытки рвоты, при которых выделяется большое количество белой пены или вообще ничего.
Нет удовлетворительного научного объяснения тому, почему возникает вздутие живота. В основном желудок наполняется газом, как надутый воздушный шар. Но с воздушным шаром есть место для расширения. В желудке его нет, поэтому газ давит на селезенку, печень и другие внутренние органы.
Если вы подозреваете, что ваш питомец страдает вздутием живота, немедленно доставьте собаку к ветеринару. Вздутие живота часто сопровождается заворотом желудка (заворотом желудка), что приводит к шоку и смерти в течение нескольких часов.
Чтобы предотвратить вздутие живота и последующее скручивание, кормите собаку небольшими порциями несколько раз в день, а не одним большим приемом пищи, и следите за тем, чтобы после еды не было тяжелых упражнений.
В следующем разделе вы найдете советы о том, что делать, если у вашего питомца сломана лапа, в том числе о том, как наложить шину.
У собак, как и у людей, ломаются все кости, но переломы конечностей встречаются чаще всего. Важно помнить, что собаки обладают высокой устойчивостью к боли, и часто кажется, что свисающая нога не причиняет боли. Поэтому не бойтесь браться за сломанную конечность (но будьте нежны!). Собака сообщит вам, если ей станет больно.
Некоторые признаки, на которые следует обратить внимание, включают ногу, которая выглядит деформированной, безвольно висит, не может выдержать вес тела и опухла. Также следите за признаками шока, такими как бледные или белые десны, учащенное сердцебиение или учащенное дыхание.
Чтобы обеспечить надлежащий уход за сломанной костью вашей собаки, воспользуйтесь следующими советами.
Шаг 1: При необходимости привяжите собаку.
Шаг 1а: Медленно подойдите к собаке, говоря успокаивающим тоном.
Шаг 1b: Наденьте поводок на шею собаки, затем наденьте поводок на неподвижный предмет. Притяните собаку к этому объекту и привяжите поводок, чтобы собака не могла двигать головой.
Шаг 1c: Наденьте собаке намордник, чтобы защитить себя.
Шаг 2: Осмотрите ногу и определите, является ли перелом открытым (рана рядом с переломом или кость выступает из кожи) или закрытым (без разрыва кожи).
Шаг 3: Если перелом закрытый, перейдите к шагу 4. Если перелом открытый:
Шаг 3а: Тщательно промойте рану чистой водой.
Шаг 3b: Накройте рану стерильной повязкой, чистой тканью или гигиенической салфеткой.
Шаг 3c: НЕ пытайтесь шинировать перелом. Поднесите большое свернутое полотенце под нешинированную конечность и немедленно доставьте собаку к ветеринару.
Шаг 4: Если сломанная конечность сильно деформирована или собака чувствует сильную боль, когда вы пытаетесь наложить шину, остановитесь и перейдите к шагу 5. В противном случае продолжайте шинировать кость.
Шаг 4а. Используйте любой доступный материал для шин — палочки, газеты, журналы или плотный картон. Цель состоит в том, чтобы обездвижить конечность, а не восстановить ее.
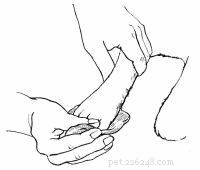
Шаг 4b: Прикрепите шины к сломанной ноге рваными полосками ткани или марли.
Шаг 4c: Плотно закрепите или завяжите полоски, но не настолько туго, чтобы не нарушить кровообращение.
Шаг 4г. Немедленно доставьте собаку к ветеринару.
Шаг 5: Если сломанная конечность сильно деформирована или собака чувствует сильную боль, когда вы пытаетесь наложить шину, подложите большое полотенце под нешинированную конечность для поддержки и немедленно доставьте собаку к ветеринару.
Будьте готовы к ожогам вашего питомца, ознакомившись с советами в следующем разделе.
Собаки просто обожают находиться под ногами, пока их хозяева готовят. Хотя это может быть замечательной чертой лучшего друга человека, это также может быть опасно, когда на кухне используется кипящая вода или горячее растительное масло.
Собака может получить ожоги первой, второй или третьей степени, вызванные огнем, высокой температурой, кипящими жидкостями, химическими веществами и электричеством. Все болезненны и могут причинить вред, даже смерть. Поверхностные ожоги, проявляющиеся болью и покраснением кожи, обычно несерьезны. Однако первая помощь должна быть оказана как можно скорее, чтобы облегчить боль.
Следующие советы помогут вам не только определить тип ожога, с которым вы имеете дело, но и подскажут, как лучше всего лечить травму.
Признаки ожога первой степени включают неповрежденный или опаленный мех, болезненные поражения или покраснение кожи с возможными волдырями. Признаками ожога второй степени являются опаленный мех или болезненные поражения, которые приобретают желто-коричневый цвет с припухлостью и волдырями. Если вы заметили какие-либо из этих предупреждающих знаков, вот что нужно делать:
Шаг 1: При необходимости привяжите собаку.
Шаг 2: Приложите холодную воду или пакеты со льдом к обожженному участку и оставьте на коже на 15 минут. НЕ применяйте мазь или масло.
Шаг 3: Если ожоги покрывают большую часть тела собаки или расположены там, где собака может их слизать, наложите стерильную повязку. НЕ используйте хлопок.
Шаг 4: Оберните повязку рваными тряпками или другим мягким материалом и завяжите или закрепите ее достаточно туго, чтобы она оставалась на месте.
Шаг 5: Как можно скорее доставьте собаку к ветеринару.
Признаки ожога третьей степени включают поражение всего участка кожи, черные или белые пятна или легко выдергивающийся мех. Также обратите внимание на признаки шока, которые включают бледные или белые десны, учащенное сердцебиение или учащенное дыхание. Если вы заметили эти признаки, сделайте следующее:
Шаг 1: При необходимости привяжите собаку.
Шаг 1а: Медленно подойдите к собаке, говоря успокаивающим тоном.
Шаг 2: Осмотрите собаку на наличие шока. Если он или она не в шоке, перейдите к шагу 3.
Шаг 2а: Осмотрите десны, осторожно приподняв верхнюю губу, чтобы десна была видна. Бледные или белые десны указывают на то, что собака почти наверняка находится в состоянии шока. Если десны розовые, вероятно, у собаки нет шока.
Шаг 2b: Определить сердцебиение. Крепко поместите пальцы на собаку примерно в 2 дюймах от локтя собаки в центре ее груди. Подсчитайте количество ударов за 10 секунд и умножьте на 6. Если собака в шоке, ее сердцебиение может превышать 150 ударов в минуту.
Шаг 2c: Положите собаку на бок с вытянутой головой. Аккуратно вытяните язык собаки, чтобы дыхательные пути оставались открытыми.
Шаг 2г. Слегка приподнимите заднюю часть собаки, положив ее на подушку или сложенное полотенце. Чтобы сохранить тепло тела, заверните собаку в одеяло или куртку.
Шаг 3: НЕ применяйте мазь или масло. Наложите сухую чистую повязку на обожженное место. НЕ используйте хлопок.
Шаг 4: Оберните повязку рваными тряпками или другим мягким материалом и завяжите или закрепите ее достаточно туго, чтобы она оставалась на месте.
Шаг 5: Как можно скорее доставьте собаку к ветеринару.
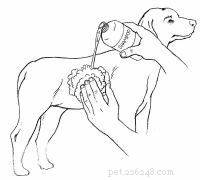
Признаки химического ожога включают химический запах, такой как скипидар, бензин или инсектицид; покрасневшая кожа; или боль. Если вы заметили эти признаки, сделайте следующее:
Шаг 1: При необходимости привяжите собаку.
Шаг 1а: Медленно подойдите к собаке, говоря успокаивающим тоном.
Шаг 2: Тщательно промойте пораженный участок водой с мылом; повторите столько раз, сколько необходимо для удаления химического вещества. Используйте мягкое мыло и хорошо вспеньте. ЗАПРЕЩАЕТСЯ использовать какие-либо растворители.
Шаг 3: Позвоните ветеринару для получения дальнейших инструкций.
Ваша собака попадает во что угодно и во что угодно? В следующем разделе приведены советы по оказанию первой помощи при удушье собаки, в том числе о том, как очистить дыхательные пути и провести сердечно-легочную реанимацию.
Когда собака подавилась посторонним предметом, ей срочно нужна помощь. Чем тяжелее он пытается дышать, тем больше паникует. Ваша цель в этой чрезвычайной ситуации — открыть дыхательные пути собаки, не будучи укушенной.
Признаки того, что собака задыхается, включают лапание во рту, бледный или синий язык, явный дистресс или потерю сознания. Если собака без сознания и вы считаете, что в ней находится посторонний предмет, вы должны открыть дыхательные пути, прежде чем проводить собаке сердечно-легочную реанимацию (СЛР). Если собака не может дышать, попытки оживить ее будут бесплодны.
Хотя все это звучит довольно сложно, вы можете помочь задыхающейся или потерявшей сознание собаке, следуя основным советам, изложенным ниже. Ваши усилия могут спасти жизнь собаке!
Шаг 1: При необходимости привяжите собаку.
Шаг 1а: Медленно подойдите к собаке, говоря успокаивающим тоном.
Шаг 2: Очистите дыхательные пути.
Шаг 2а: Осторожно откройте пасть собаки, взявшись одной рукой за верхнюю челюсть над мордой.
Шаг 2b: Прижмите губы собаки к верхним зубам, надавив большим пальцем с одной стороны и пальцами с другой так, чтобы губы оказались между зубами собаки и вашими пальцами. Сильно надавите, чтобы заставить рот открыться.
Шаг 2c: Если вы видите объект, попробуйте удалить его пальцами.
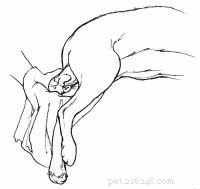
Шаг 2г. Если вы не можете убрать предмет, а собака достаточно маленькая, поднимите ее, схватив за задние лапы; переверните его вверх дном и энергично встряхните. Похлопывание по спине во время тряски может помочь сместить объект.
Шаг 2e: Если вы не можете убрать предмет, а собака слишком велика, чтобы ее поднять, положите собаку на бок на пол. Поместите руку сразу за грудной клеткой и быстро и сильно надавите вниз и слегка вперед. Выпуск. Быстро повторите несколько раз, пока предмет не будет выброшен.
Шаг 3: Если вы не можете сместить объект, немедленно доставьте собаку к ветеринару.
Шаг 4: Если вы сместите предмет, а собака не дышит, почувствуйте сердцебиение, поместив пальцы примерно на 2 дюйма за локоть собаки посередине ее груди.
Шаг 5: Если сердце собаки не бьется, перейдите к шагу 6. Если да, выполните искусственное дыхание.
Шаг 5а: Переверните собаку на бок.
Шаг 5b: Вытяните голову и шею собаки. Держите рот и губы собаки закрытыми и сильно подуйте ей в ноздри. Делайте 1 вдох каждые 3-5 секунд. Сделайте глубокий вдох и повторяйте, пока не почувствуете сопротивление или не увидите, как поднимается грудная клетка.
Шаг 5c: Через 10 секунд остановитесь. Следите за движением грудной клетки, чтобы указать, что собака дышит самостоятельно.
Шаг 5г. Если собака не дышит, продолжайте искусственное дыхание.
Шаг 6: Если сердце не бьется, проведите сердечно-легочную реанимацию.
Шаг 6а: Переверните собаку на спину.
Шаг 6b: Встаньте на колени перед головой собаки.
Шаг 6c: Сцепите руки на груди собаки, положив ладони по обеим сторонам ее груди.
Шаг 6г. Плотно сожмите ладони на груди на счет «2» и отпустите на счет «1». Требуется умеренное давление. Повторяйте от 60 до 90 раз в минуту.
Шаг 6e: Alternately (after 30 seconds), hold the dog's mouth and lips closed and blow firmly into its nostrils. Blow for 3 seconds, take a deep breath, and repeat until you feel resistance or see the dog's chest rise. Try to repeat this 10 to 20 times per minute. As a general rule, use a CPR ratio of about 5 heart compressions to 1 breath of air.
Шаг 6f: After 1 minute, stop. Look at the chest for breathing movement, and feel for a heartbeat by placing fingers about 2 inches behind the dog's elbow in the center of its chest.
Шаг 6g: If the dog's heart is not beating, continue CPR. If the heart starts beating, but the dog is still not breathing, return to Step 5.
Шаг 6а: Turn the dog on its side.
Шаг 6b: Place the palm of your hand in the middle of the dog's chest.
Шаг 6c: Press for a count of "2," and release for a count of "1." Firm pressure is required. Repeat about 60 to 90 times per minute.
Шаг 6г. Alternately (after 30 seconds), hold the dog's mouth and lips closed and blow firmly into its nostrils. Blow for 3 seconds, take a deep breath, and repeat until you feel resistance or see the chest rise. Try to repeat this 10 to 20 times per minute.
Шаг 6e: After 1 minute, stop. Look at the chest for breathing movement, and feel for a heartbeat by placing your fingers about 2 inches behind the dog's elbow in the center of its chest.
Шаг 6f: If the dog's heart is not beating, continue CPR. If the heart starts beating but the dog is still not breathing, return to Step 5.
Шаг 7: Transport the dog immediately to the veterinarian. CPR or artificial respiration should be continued on the way to the veterinarian or until dog is breathing and its heart is beating without assistance.
Witnessing a seizure can be a scary thing, but don't panic. Use the tips on the next page to help you if your pet experiences convulsions or seizures.
A convulsion or seizure is the result of constant electrical firing of the muscles of the body from the brain. Convulsions are rarely fatal, and most last only a few minutes. A typical seizure is then followed by 15 minutes to a half hour of recovery time, during which period the dog may be dazed and confused.
Not all seizures are due to epilepsy. Some are caused by lead or other poisons, liver diseases, and even brain tumors. Seizures or convulsions should never be taken lightly. The problem should be discussed with your veterinarian as soon as possible.
The most important thing to do if your dog is experiencing a seizure is to protect it from self-injury. Be patient, don't panic, and use the following tips to provide proper care.
Шаг 1: DO NOT place your fingers or any object in the dog's mouth.
Шаг 2: Pull the dog away from walls and furniture to prevent self-injury.
Шаг 3: Seizures can raise your dog's body temperature fast, so don't wrap the dog in a blanket or towel for comfort until the seizure is over. Instead, place cool washcloths on his feet to help keep his temperature from rising.
Шаг 4: After the seizure has stopped, contact your veterinarian for further instructions. You can now wrap your dog in a towel or blanket to comfort him after the seizure he's alert.
Шаг 5: If you're able to, time your dog's seizure. If it lasts less than 2 minutes, he should be OK but you should still consult with your veterinarian. If it lasts between 2 and 5 minutes, this is starting to hit the warning zone and you dog should take your dog to the vet as soon as possible. If the seizure lasts longer than 5 minutes, he needs to be treated by your veterinarian immediately.
A common ailment among most pets, diarrhea can become a serious problem if not treated properly. Turn to the next section for helpful tips.
Diarrhea is a commonly encountered problem that occurs when food is passed through a dog's intestine too rapidly. It can be caused by allergies, milk, parasites, spoiled food, or bacterial infection. There are also more serious causes such as tumors; viral infections; and diseases of the liver, pancreas, and kidney.
Be sure to seek professional help if blood, severe depression, or abdominal pain are present in your pet. Otherwise, use the following suggestions to help ease a dog's discomfort.
Шаг 1: Remove all food for 12 to 24 hours. Water is important to prevent dehydration in severe diarrhea. Его не следует удалять.
Шаг 2: If blood appears or if diarrhea continues for more than 24 hours, contact the veterinarian. He or she will probably want to see a stool sample.
Шаг 3: After at least 12 hours, treat the dog by feeding it a bland diet such as boiled skinless chicken and rice (50:50 mixture). When stools begin to form, slowly phase back to regular diet. Kaopectate or Pepto-Bismol can be safely used in dogs. Call your veterinarian for the correct dosage for your pet.
When people think of animal bites, they usually think of a human being bit by a dog. But dogs can also be the victims of bites from dogs or other animals lurking in the backyard. Check the next section for first-aid tips when your dog experiences an animal bite.
When a dog gets into a fight with another dog, a cat, or a wild animal, damage can occur to both the skin and the underlying tissue. Many dogfights can be avoided by not permitting your dog to run loose and by keeping it on a leash when you walk it. The dog should also be trained to obey your commands.
If your dog does get into a fight, do not try to break it up with your bare hands. A fighting dog will bite anything in its way, including you. Pull your leashed dog out of harm's way or use a long stick. After the fight is over, examine your dog carefully for hidden wounds. You'll often find punctures around the neck area and on the legs. Look through the hair carefully to find bloodstains, which would indicate the skin has been punctured.
It is important to determine if the biting animal has been inoculated against rabies. If the biter is a wild animal such as a skunk or raccoon, efforts should be made to destroy it so the brain can be examined for rabies. Never touch the wild animal with your bare hands, even after it has been killed. Wear gloves or wrap the body in a blanket. Your veterinarian will take care of the rabies examination.
To provide proper care to a dog suffering from an animal bite, use the following tips.
Шаг 1: Restrain the dog if necessary.
Шаг 1а: Approach the dog slowly, speaking in a reassuring tone of voice.
Шаг 1b: Slip a leash around the dog's neck, then place the leash around a fixed object. Pull the dog against this object and tie the leash so the dog cannot move its head.
Шаг 1c: Muzzle the dog to protect yourself.
Шаг 2: Clip the hair around the wound.
Шаг 3: Тщательно промойте рану чистой водой. Avoid home antiseptics, which may cause pain when applied.
Шаг 4: Examine the wound. If the tissue under the wound appears to pass by when you move the skin, the wound will probably require stitches.
Шаг 5: DO NOT bandage. Allow the wound to drain unless there is excessive bleeding. If the wound does bleed excessively, follow these steps:
Шаг 5а: Cover wound with clean cloth, sterile dressing, or sanitary napkin.
Шаг 5b: Place your hand over the dressing and press firmly.
Шаг 5c: Keep pressure on the dressing to stop the bleeding.
Шаг 5г. If blood soaks through the dressing, DO NOT remove it. Apply more dressing and continue to apply pressure until the bleeding stops.
Шаг 6: If the wound is deep enough to require stitches, transport the dog immediately to the veterinarian.
Шаг 7: Be sure to contact your veterinarian if your dog is not current on its rabies vaccination.
Dogs are natural swimmers, but situations can occur where a dog swims too far and starts drowning. Turn to the next section to find out how to best handle this type of emergency.
Dogs are naturally good swimmers for short distances, but they can get into trouble. Sometimes they get too far from the shore and tire trying to swim back, or they fall into a swimming pool and cannot get up the steep sides.
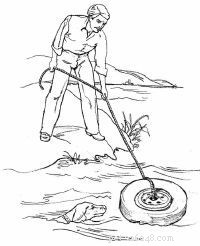
Always protect yourself when trying to rescue a drowning dog. An extra few moments of preparation can save two lives -- yours and the dog's. Also be sure to watch for signs of shock, which include pale or white gums, a rapid heartbeat, or rapid breathing. Use the following tips when rescuing a drowning dog.
Шаг 1: Rescue the dog.
Шаг 1а: Holding the attached rope, throw a life preserver toward the dog. OR
Шаг 1b: Try to hook the dog's collar with a pole. OR
Шаг 1c: Row out to the dog in a boat. OR
Шаг 1г: As a last resort, swim to the dog. Protect yourself. Bring something for the dog to cling to or climb on and be pulled to shore.
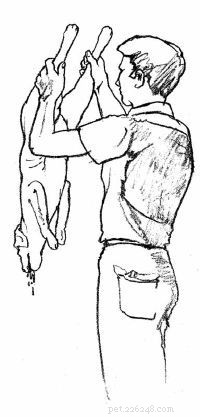
Шаг 2: Drain the dog's lungs.
Шаг 2а: If you can lift the dog, grasp the rear legs and hold the animal upside down for 15 to 20 seconds. Give 3 or 4 downward shakes to help drain fluid from its lungs.
Шаг 2b: If you cannot lift the dog, place it on a sloping surface with its head low to facilitate drainage.
Шаг 3: If the dog is not breathing, feel for a heartbeat by placing your fingers about 2 inches behind the dog's elbow in the middle of its chest.
Шаг 4: If the heart is not beating, proceed to Step 5. If it is, perform artificial respiration.
Шаг 4а. Turn the dog on its side.
Шаг 4b: Extend the dog's head and neck. Hold the dog's mouth and lips closed and blow firmly into its nostrils. Administer 1 breath every 3 to 5 seconds. Take a deep breath, and repeat until you feel resistance or see the chest rise.
Шаг 4c: After 10 seconds, stop. Watch the dog's chest for movement to indicate it is breathing on its own.
Шаг 4г. If the dog is not breathing, continue artificial respiration.
Шаг 5: Если сердце не бьется, проведите сердечно-легочную реанимацию (СЛР).
Шаг 5а: Turn the dog on its back.
Шаг 5b: Kneel down at the head of the dog.
Шаг 5c: Clasp your hands over the dog's chest with your palms resting on either side of its chest.
Шаг 5г. Compress your palms on the chest firmly for a count of "2," and release for a count of "1." Moderate pressure is required. Repeat about 60 to 90 times per minute.
Шаг 5e: Alternately (after 30 seconds), hold the dog's mouth and lips closed and blow firmly into its nostrils. Blow for 3 seconds, take a deep breath, and repeat until you feel resistance or see the dog's chest rise. Try to repeat this 10 to 20 times per minute. As a general rule, use a CPR ratio of about 5 heart compressions to 1 breath of air.
Step 5f: After 1 minute, stop. Look at the chest for breathing movement, and feel for a heartbeat by placing fingers about 2 inches behind the dog's elbow in the center of its chest.
Step 5g: If the dog's heart is not beating, continue CPR. If the heart starts beating, but the dog is still not breathing, return to Step 4.
Шаг 5а: Turn the dog on its side.
Шаг 5b: Place the palm of your hand in the middle of the dog's chest.
Шаг 5c: Press for a count of "2," and release for a count of "1." Firm pressure is required. Repeat about 60 to 90 times per minute.
Шаг 5г. Alternately (after 30 seconds), hold the dog's mouth and lips closed and blow firmly into its nostrils. Blow for 3 seconds, take a deep breath, and repeat until you feel resistance or see the chest rise. Try to repeat this 10 to 20 times per minute.
Шаг 5e: After 1 minute, stop. Look at the chest for breathing movement, and feel for a heartbeat by placing your fingers about 2 inches behind the dog's elbow in the center of its chest.
Step 5f: If the dog's heart is not beating, continue CPR. If the heart starts beating but the dog is still not breathing, return to Step 4.
Шаг 6: Transport the dog immediately to the veterinarian. CPR or artificial respiration should be continued until the dog is breathing and its heart is beating without assistance.
Puppies love to chew -- and they rarely discriminate between what they chew and what they avoid. If your puppy gets a hold of an electrical cord, you may be faced with treating electrical shock. Check the next section for tips on dealing with this type of pet emergency.
Grown dogs are seldom victims of electrical shock. But puppies are naturally curious and will chew almost anything, including electrical cords. If the insulation is punctured and the mouth comes in contact with both wires, the dog will receive a shock and may be unable to release the cord.
Electrocution can cause severe heart damage and fluid accumulation in the lungs. Strong shock can stop the heart, and CPR will need to be performed immediately to start the heart beating again. In addition, the dog's mouth will likely be burned from contact with the bare wires. Be sure to watch for signs of shock, which include pale or white gums, a rapid heartbeat, or rapid breathing.
To provide the proper care for your pet who is suffering from electrical shock, use the following tips.
Шаг 1: If the dog still has the electrical cord in its mouth, DO NOT touch the dog. First remove the plug from its outlet.
Шаг 2: If the dog is unconscious, check for breathing. If the dog is conscious and breathing, proceed to Step 6. If the dog is not breathing, feel for a heartbeat by placing your fingers about 2 inches behind the elbow in the middle of its chest.
Шаг 3: If the heart is not beating, proceed to Step 4. If it is, perform artificial respiration.
Шаг 3а: Turn the dog on its side, and extend its head and neck.

Шаг 3b: Hold the dog's mouth and lips closed and blow firmly into its nostrils. Administer 1 breath every 3 to 5 seconds. Take a deep breath, and repeat until you feel resistance or see the chest rise.
Шаг 3c: After 10 seconds, stop. Watch the dog's chest for movement to indicate the dog is breathing on its own.
Шаг 3г. If the dog is not breathing, continue artificial respiration.
Шаг 4: If the heart is not beating, perform CPR.
Шаг 4а. Turn the dog on its back.
Шаг 4b: Kneel down at the head of the dog.
Шаг 4c: Clasp your hands over the dog's chest with your palms resting on either side of its chest.
Шаг 4г. Compress your palms on the chest firmly for a count of "2," and release for a count of "1." Moderate pressure is required. Repeat about 60 to 90 times per minute.
Шаг 4e: Alternately (after 30 seconds), hold the dog's mouth and lips closed and blow firmly into its nostrils. Blow for 3 seconds, take a deep breath, and repeat until you feel resistance or see the dog's chest rise. Try to repeat this 10 to 20 times per minute. As a general rule, use a CPR ratio of about 5 heart compressions to 1 breath of air.
Шаг 4f: After 1 minute, stop. Look at the chest for breathing movement, and feel for a heartbeat by placing fingers about 2 inches behind the dog's elbow in the center of its chest.
Шаг 4g: If the dog's heart is not beating, continue CPR. If the heart starts beating, but the dog is still not breathing, return to Step 3.
Шаг 4а. Turn the dog on its side.
Шаг 4b: Place the palm of your hand in the middle of the dog's chest.
Шаг 4c: Press for a count of "2," and release for a count of "1." Firm pressure is required. Repeat about 60 to 90 times per minute.
Шаг 4г. Alternately (after 30 seconds), hold the dog's mouth and lips closed and blow firmly into its nostrils. Blow for 3 seconds, take a deep breath, and repeat until you feel resistance or see the chest rise. Try to repeat this 10 to 20 times per minute.
Шаг 4e: After 1 minute, stop. Look at the chest for breathing movement, and feel for a heartbeat by placing your fingers about 2 inches behind the dog's elbow in the center of its chest.
Шаг 4f: If the dog's heart is not beating, continue CPR. If the heart starts beating but the dog is still not breathing, return to Step 3.
Шаг 5: Transport the dog immediately to the veterinarian. CPR or artificial respiration should be continued until the dog is breathing and its heart is beating without assistance.
Шаг 6: If the dog's mouth or lips are burned (bright red), swab them gently with 3% hydrogen peroxide.
Шаг 7: To conserve body heat, wrap the dog in a blanket or jacket.
Just like humans, dogs often have problems with their eyes due to dust, allergies, and other culprits. See the next page for tips on dealing with eye injuries.
Irritation of the eye in a dog can be caused by allergies, dust and dirt, lashes growing inward, fights, and more. It can result in a mild inflammation of the tissue around the eye (conjunctivitis) or severe damage to the cornea.
When examining a dog's eye, it is important to know that dogs have a third eyelid located in the corner of the eye nearest the nose. This third eyelid can completely cover the eyeball and sometimes gives the appearance that part of the eye is gone.
In addition to being a protective mechanism, the third eyelid can indicate that something is wrong with the eye. Если он приподнят и выглядит красным, глаз воспален. Do not try to touch or manipulate this eyelid.
Other indications that a dog's eye is irritated are squinting and rubbing and pawing at the eye. Your first priority is to prevent your pet from further injuring itself since this often causes more severe damage than the original irritation. Use the following tips to treat your dog's eye injuries.
Шаг 1: DO NOT try to remove the object.
Шаг 2: Restrain the dog if necessary.
Шаг 2а: Approach the dog slowly, speaking in a reassuring tone of voice.
Шаг 3: Prevent self-injury to the eye.
Шаг 3а: Dewclaws (if present) should be bandaged on the front paw on the same side as the affected eye.
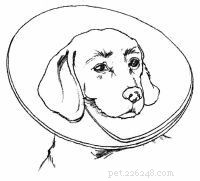
Шаг 3b: For small dogs, cut a large piece of cardboard into an Elizabethan-type collar.
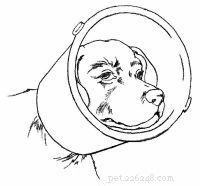
Шаг 3c: For larger dogs, cut the bottom from a plastic bucket, fit the bucket over the dog's head, and hold it in place by tying it to the dog's collar.
Шаг 4: Transport the dog immediately to the veterinarian.
The typical signs of a scratched or irritated eye include squinting; rubbing or pawing at the eyes; or thick discharge or redness in the eye.
Шаг 1: Restrain the dog if necessary.
Шаг 1а: Approach the dog slowly, speaking in a reassuring tone of voice.
Шаг 2: Flush the dog's eye thoroughly with saline solution or plain water.
Шаг 3: Prevent self-injury to the eye.
Шаг 3а: Dewclaws (if present) should be bandaged on the front paw on the same side as the affected eye.
Шаг 3b: For small dogs, cut a large piece of cardboard into an Elizabethan-type collar.
Шаг 3c: For larger dogs, cut the bottom from a plastic bucket, fit the bucket over the dog's head, and hold it in place by tying it to the dog's collar.
Шаг 4: Transport the dog immediately to the veterinarian.
A dog can be sensitive to extreme cold, especially its ears and the tip of its tail. If you suspect your pet is suffering from frostbite, take note of the first-aid tips on the next page.
When a dog is exposed to freezing temperatures for a long period of time, there is always the possibility of frostbite. The signs of frostbite include pain, pale skin in early stages, and red or black skin in advanced stages.
The areas most likely to be frostbitten are those that have little or no hair and the ears and tail tip, which have a limited blood supply. Occasionally, if damage from frostbite is severe, part of the tail or ear tips may actually fall off. Professional attention should be sought before this happens. To provide proper care to a dog suffering from frostbite, use the following tips.
Шаг 1: Restrain the dog if necessary.
Шаг 1а: Approach the dog slowly, speaking in a reassuring tone of voice.
Шаг 1b: Slip a leash around the dog's neck, then place the leash around a fixed object. Pull the dog against this object and tie the leash so the dog cannot move its head.
Шаг 1c: Muzzle the dog to protect yourself, if necessary.
Шаг 2: Согрейте пораженный участок влажными полотенцами. The water temperature should be warm but not hot (75 degrees Fahrenheit/24 degrees Celsius). DO NOT use ointment.
Шаг 3: If the skin turns dark, transport the dog to the veterinarian as soon as possible.
Just as exposure to extreme cold can be harmful to your pet, so, too, can extreme heat. Check the next section to learn how to treat a dog that has heatstroke.
Heatstroke is caused by the inability of the body to maintain its normal temperature because of the environmental heat. It is often caused by keeping a dog in a locked car parked in the sun or by keeping it in any hot area without adequate ventilation.
The signs of heatstroke are excessive drooling, lack of coordination, rapid breathing, and a top of the head that is hot to the touch. Prompt treatment is urgent. Body temperatures often get as high as 107 degrees Fahrenheit/41.5 degrees Celsius, and without quick cooling, severe brain damage and death will occur.
Heatstroke can be prevented by making sure your dog has plenty of shade and ventilation. If you must take your dog driving with you, park in the shade and leave all the windows partially open.
Should heatstroke occur, use the following suggestions to help you provide your dog with the utmost care.
Шаг 1: Remove the dog from the hot environment.
Шаг 2: Immerse the dog in a cold water bath or continuously run a garden hose on its body; continue either treatment for at least 30 minutes.
Шаг 3: Apply ice packs to the top of the head; keep them there while transporting the dog to the veterinarian.
Шаг 4: Transport the dog to the veterinarian immediately after the above treatment.
Another pet injury that requires immediate professional treatment is hypothermia. Check the next page for tips on what to do if you suspect your pet is suffering from this condition.
Exposure to either cold water or freezing temperatures can cause hypothermia, or subnormal body temperatures. A dog's survival will depend on how low its body temperature drops.
A dog's normal body temperature is 100 to 101 degrees Fahrenheit/38 degrees Celsius. If it drops below 90 degrees Fahrenheit/32 degrees Celsius for any length of time, normal bodily functions will be severely impaired.
The signs of hypothermia include depression, subnormal body temperature, and coma. This condition always requires veterinary attention as soon as possible. Use the following tips to help you provide proper care to a dog suffering from hypothermia.
Шаг 1: Warm the dog.
Шаг 1а: Place a hot water bottle (100 degrees Fahrenheit/37 degrees Celsius) against the dog's abdomen. Wrap the bottle in a cloth to prevent burns. Wrap the dog in a blanket or jacket.
Шаг 2: Transport the dog immediately to the veterinarian.
Just like humans, dogs can be allergic to insect bites, so it's important to know the warning signs. Learn more about treating insect stings on the next page.
While most insect bites to a dogwill be uneventful, if your pet has been stung by a bee, wasp, yellow jacket, or hornet, the area will quickly become swollen and somewhat painful. A possible allergic reaction to the venom deposited by the insect is the most serious problem.
The signs of an insect bite include swelling, pain in the muscles and affected area, vomiting, weakness, fever, and shock. The signs of shock are pale or white gums, a rapid heartbeat, or rapid breathing. Below are helpful suggestions on what to do if your pet has been stung by a pest.
Шаг 1: Restrain the dog if necessary.
Шаг 1а: Approach the dog slowly, speaking in a reassuring tone of voice.
Шаг 1b: Muzzle the dog to protect yourself, if necessary.
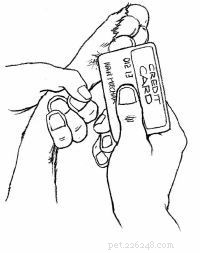
Шаг 2: DO NOT pinch the area. If the dog has been stung by a bee, scrape the stinger off immediately with a credit card or dull knife. Other insects do not leave the stinger in the skin.
Шаг 3: If the affected area is swollen and hot, apply cortisone cream and hold ice on the dog's skin for a short time.
Шаг 4: Administer antihistamine such as diphenhydramine (Benadryl) orally at a dose of 1mg per pound of body weight (e.g., a 25-pound dog would get 25mg pill or capsule).
Шаг 5: If the dog experiences any difficulty breathing or if its face seems swollen, transport the dog immediately to the veterinarian.
Did you know your house is filled with products that are poisonous to your beloved pet? Check the next page to find out what they are and what to do if your dog gets a hold of one of these harmful substances.
Dogs are curious creatures and like to investigate, which leads to many accidental poisonings each year. Often a dog will find an open can or bottle of some chemical and, accidentally or on purpose, spill it. Naturally the chemical gets on its fur and paws, and while licking the area clean, it swallows the possibly toxic substance. It is your responsibility as a pet owner to keep all potentially toxic products tightly closed and out of your dog's reach.
Some of the signs of a possible poisoning include excessive drooling, vomiting, diarrhea, abdominal pain, twitching, nervousness, convulsions, coma, and a chemical odor on the body. Here's what you can do if your dog is poisoned:
Шаг 1: If the dog is comatose or convulsing, wrap it in a blanket and transport your pet immediately to the veterinarian with the suspect poison container, plant, or leaf.
Шаг 2: If the dog has a chemical odor on its skin, wash the entire dog with mild soap until the odor is gone. If the poison was licked or ingested, flushing the dog's mouth with clean water may also help in decontamination.
Шаг 3: If the dog has not already vomited and the poison is not a caustic or petroleum product (see lists below), induce vomiting by giving 1 tablespoon of 3% hydrogen peroxide per 20 pounds every 10 minutes until vomiting starts. If no vomiting occurs within 30 minutes, transport the dog immediately to the veterinarian with the suspected poison container.
Шаг 4: Call the Pet Poison Control hotline for further instructions at 888-426-4435. (Эта услуга платная.)
Caustics include battery acid, corn and callous remover, dishwashing detergent, drain cleaner, grease remover, lye, and oven cleaner. Нефтепродукты включают растворитель краски, воск для пола и раствор для химической чистки.
You might be surprised by the number of household items that are poisonous to your dog. Some of the most common are alcoholic beverages, ammonia, antifreeze, bleach, chocolate (baking chocolate is the worst), detergents, disinfectants, dry-cleaning solution, fertilizer, furniture polish, gasoline, glue, grapes and raisins, human medications, mothballs, mouse and rat poison, onions, oven cleaners, paint thinner and remover, shoe polish, silver polish, and toilet bowl cleaner.
In addition, some household plants are toxic to your pet, including aloe vera, amaryllis, avocado, azalea, bird of paradise, calla lily, castor bean, corn plant, cyclamen, daffodil, day lily, dieffenbachia, Easter lily, elephant ears, English ivy, gladiolus, holly, hyacinth, hydrangea, iris, kalanchoe, macadamia nut, mistletoe, narcissus, onion, philodendron, poinsettia, rhododendron, tomato plant, tulip, yew, and yucca.
(This is only a partial list. For a more complete listing, refer to the ASPCA Animal Poison Center at www.aspca.org.)
Dogs can also become poisoned from smoke or carbon monoxide. Check the next section for tips on what to do in this first-aid emergency.

Fires are another possible threat to dogs. Do not risk your own life to save your dog. Leave that task to the firefighters or those trained in rescue.
The signs of smoke or carbon monoxide inhalation include depression, lack of coordination, heavy panting, deep red gums, and possible convulsions. Also watch for signs of shock, which are pale or white gums, a rapid heartbeat, or rapid breathing.
If suspect your pet is suffering from smoke or carbon monoxide inhalation, use the following tips to provide the dog with proper care.
Шаг 1: Remove the dog from the area and into fresh air immediately.
Шаг 2: Flush the dog's eyes thoroughly with saline solution or clean water.
Шаг 3: Transport the dog immediately to the veterinarian.
Шаг 1: Remove the dog from the area and into fresh air immediately.
Шаг 2: If the dog is not breathing, feel for a heartbeat by placing your fingers about 2 inches behind the dog's elbow in the middle of its chest.
Шаг 3: If the heart is not beating, proceed to Step 4. If it is, perform artificial respiration.
Шаг 3а: Turn the dog on its side.
Шаг 3b: Hold the dog's mouth and lips closed and blow firmly into its nostrils. Administer 1 breath every 3 to 5 seconds. Take a deep breath, and repeat until you feel resistance or see the dog's chest rise.
Шаг 3c: After 1 minute, stop. Watch the chest for movement to indicate the dog is breathing on its own.
Шаг 3г. If the dog is not breathing, continue artificial respiration.
Шаг 4: Если сердце не бьется, проведите сердечно-легочную реанимацию (СЛР).
Шаг 4а. Turn the dog on its back.
Шаг 4b: Kneel down at the head of the dog.
Шаг 4c: Clasp your hands over the dog's chest with your palms resting on either side of its chest.
Шаг 4г. Compress your palms on the chest firmly for a count of "2," and release for a count of "1." Moderate pressure is required. Repeat about 60 to 90 times per minute.
Шаг 4e: Alternately (after 30 seconds), hold the dog's mouth and lips closed and blow firmly into its nostrils. Blow for 3 seconds, take a deep breath, and repeat until you feel resistance or see the dog's chest rise. Try to repeat this 10 to 20 times per minute. As a general rule, use a CPR ratio of about 5 heart compressions to 1 breath of air.
Шаг 4f: After 1 minute, stop. Look at the chest for breathing movement, and feel for a heartbeat by placing your fingers about 2 inches behind the dog's elbow in the center of its chest.
Шаг 4g: If the dog's heart is not beating, continue CPR. If the heart starts beating, but the dog is still not breathing, return to Step 3.
Шаг 4а. Turn the dog on its side.
Шаг 4b: Place the palm of your hand in the middle of the dog's chest.
Шаг 4c: Press for a count of "2," and release for a count of "1." Firm pressure is required. Repeat about 60 to 90 times per minute.
Шаг 4г. Alternately (after 30 seconds), hold the dog's mouth and lips closed and blow firmly into its nostrils. Blow for 3 seconds, take a deep breath, and repeat until you feel resistance or see the chest rise. Try to repeat this 10 to 20 times per minute.
Шаг 4e: After 1 minute, stop. Look at the chest for breathing movement, and feel for a heartbeat by placing your fingers about 2 inches behind the dog's elbow in the center of its chest.
Шаг 4f: If the dog's heart is not beating, continue CPR. If the heart starts beating but the dog is still not breathing, return to Step 3.
Шаг 5: Transport the dog immediately to the veterinarian. CPR or artificial respiration should be continued on the way to the veterinarian or until the dog is breathing and its heart is beating without assistance.
A puncture wound can be quite painful and traumatic for a dog. In the next section, we'll learn how to treat this type of injury.
A puncture wound on a dog may be difficult to see because it is often covered with hair. Since the most common location for a puncture wound is the bottom of the paw, the first sign may be a limp. Slightly blood-tinged fur is a common sign of a puncture wound on other parts of the body.
If you suspect your dog has a puncture wound, be sure to watch for signs of shock, which include pale or white gums, a rapid heartbeat, or rapid breathing. The following tips will help you treat your wounded pet.
Шаг 1: Restrain the dog if necessary, taking care not to touch the object.
Шаг 1а: Approach the dog slowly, speaking in a reassuring tone of voice.
Шаг 1b: Slip a leash around the dog's neck, then place the leash around a fixed object. Pull the dog against this object and tie the leash so the dog cannot move its head.
Шаг 1c: Muzzle the dog to protect yourself if necessary.
Шаг 2: DO NOT attempt to remove the object.
Шаг 3: Place clean cloths, sterile dressings, or sanitary napkins around the point of entry.
Шаг 4: Bandage tightly around the point of entry.
Шаг 5: Transport the dog immediately to the veterinarian.

Шаг 1: Restrain the dog if necessary.
Шаг 1а: Approach the dog slowly, speaking in a reassuring tone of voice.
Шаг 2: If the wound is in the chest and a "sucking" noise is heard, bandage tightly enough to seal the wound, and transport the dog immediately to the veterinarian.
Шаг 3: If the wound is not in the chest, clip the hair around the wound.

Шаг 4: Examine the wound carefully for foreign objects. If present, remove the object with tweezers or needle-nose pliers.
Шаг 5: Тщательно промойте рану чистой водой. Avoid home antiseptics, which may cause pain when applied.
Шаг 6: DO NOT bandage. Allow the wound to drain unless there is excessive bleeding. If the wound does bleed excessively, follow these steps:
Шаг 6а: Cover wound with clean cloth, sterile dressing, or sanitary napkin.
Шаг 6b: Place your hand over the dressing and press firmly.
Шаг 6c: Keep pressure on the dressing to stop the bleeding.
Шаг 6г. If blood soaks through the dressing, DO NOT remove it. Apply more dressing and continue to apply pressure until the bleeding stops.
Шаг 7: If the bleeding does not stop within 5 minutes, continue to apply pressure on the wound while transporting the dog to the veterinarian.
Knowing how to identify the signs of shock and how to treat it will help you in many pet first-aid situations. In the next section, learn about proper care for dogs experiencing shock.
Shock is extremely serious; it is the No. 1 killer in accidents. Shock is a reaction to heavy internal or external bleeding or any serious injury that "scares" the body; for example, a large wound or amputation with heavy blood loss. The body tries to compensate for the loss by speeding up the heart rate to keep the blood pressure from falling. At the same time the blood vessels that supply the outside of the body narrow. This is to conserve blood so vital organs of the body can continue to receive their normal blood supply.
However, if there is heavy blood loss or other serious injury, the body overreacts and causes a pooling of blood in the internal organs. This can cause death due to a drop in external blood pressure and possible oxygen starvation of the brain.
The signs of shock include pale or white gums, a rapid faint heartbeat, rapid breathing, or below-normal body temperature (feels cold). If your dog is in shock, use the following tips to provide proper first aid.
Шаг 1: Examine the dog for shock.
Шаг 1а: Examine the gums by gently lifting the dog's upper lip so the gum is visible. Pale or white gums indicate the dog is almost certainly in shock and may have serious internal injuries and/or bleeding. If the gums are pink, the dog is probably not in shock.
Шаг 1b: Determine the dog's heartbeat. Place your fingers firmly on the dog about 2 inches behind the dog's elbow in the center of its chest. Count the number of beats in 10 seconds and multiply by 6. If the dog is in shock its heartbeat may be more than 150 beats per minute.
Шаг 2: Place the dog on its side with its head extended.
Шаг 3: Gently pull out the dog's tongue to keep the airway open.
Шаг 4: Elevate the dog's hindquarters slightly by placing them on a pillow or folded towels.
Шаг 5: Stop visible bleeding immediately. If blood is spurting and the wound is on the leg or tail, proceed to Step 6.
Шаг 5а: Накройте рану чистой тканью, стерильной повязкой или гигиенической салфеткой.
Шаг 5b: Place your hand over the dressing and press firmly.
Шаг 5c: Keep pressure on the dressing to stop bleeding. If blood soaks through the dressing, DO NOT remove it. Apply more dressing and continue to apply pressure until the bleeding stops. If bleeding does not stop within 5 minutes, continue to apply pressure on the wound while transporting the dog to the veterinarian.
Шаг 5г. Wrap torn rags or other soft material around the dressing and tie or tape it just tightly enough to keep the bandage on. Start below the wound and wrap upward.
Шаг 6: If bleeding does not stop within 5 minutes, transport the dog immediately to the veterinarian.
Шаг 7: To conserve body heat, wrap the dog in a blanket or jacket.
A dog's encounter with a skunk is not only smelly, but it can also be dangerous, since skunks are a major carrier of rabies. Turn to the next page to find out what to do if your pet has been sprayed by a skunk.
Skunks are one of the major carriers of rabies in North America. Therefore, a dog's encounter with a skunk should be treated as more than just a stinky situation. Use the following suggestions to provide proper care for your pet.
Шаг 1: Restrain the dog if necessary.
Шаг 1а: Approach the dog slowly, speaking in a reassuring tone of voice.
Шаг 1b: Slip a leash around the dog's neck, then place the leash around a fixed object. Pull the dog against this object and tie the leash so the dog cannot move its head.
Шаг 1c: Muzzle the dog to protect yourself.
Шаг 2: Flush the dog's eyes with fresh water.
Шаг 3: Remove and destroy leather collars or harnesses.
Шаг 4: Bathe the dog thoroughly with soap or shampoo and water. Repeat several times.

Шаг 5: Apply plain tomato juice liberally. After several minutes, bathe the dog again with soap or shampoo and water. Time will eventually remove the odor. Skunk odor neutralizers are available.
Шаг 6: If the skunk is destroyed, take it to the veterinarian for a rabies examination. DO NOT touch the skunk with your bare hands.
Шаг 7: If the dog is not currently vaccinated for rabies, contact the veterinarian.
An encounter with a snake can also create a pet emergency situation. See the next section for how to treat snakebites.
Poisonous snakebites are rare in North America. Most snakes are nonpoisonous, and neither poisonous nor nonpoisonous snakes will attack a dog unless provoked. But many pets are curious, and bites will occur.
If you live in or visit a snake-inhabited area, you can expect problems if you let your dog run loose. Be prepared by reading the following tips for treating snakebites.
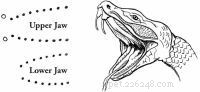
The signs of a poisonous snakebite are two fang marks, pain, swelling, vomiting, difficulty breathing, and possible paralysis and convulsions. Be sure to watch for sings of shock, which include pale or white gums, a rapid heartbeat, or rapid breathing.
Treatment must begin as soon as possible after the bite. If the snake was killed, bring it to the veterinarian for identification. Otherwise, try to remember identifying marks.
Шаг 1: Restrain the dog if necessary.
Шаг 1а: Approach the dog slowly, speaking in a reassuring tone of voice.
Шаг 1b: Slip a leash around the dog's neck, then place the leash around a fixed object. Pull the dog against this object and tie the leash so the dog cannot move its head.
Шаг 1c: Muzzle the dog to protect yourself if necessary.
Шаг 2: Clip the hair from the bite area.
Шаг 3: Flush thoroughly by pouring 3% hydrogen peroxide directly on the bite.
Шаг 4: Transport the dog immediately to the veterinarian.
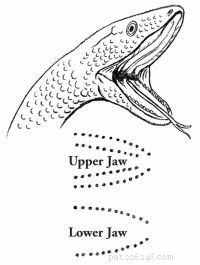
The signs of a nonpoisonous snakebite are a U-shape bite and pain in the bite area. If you are not sure the snake is nonpoisonous, treat as poisonous. See above.
Шаг 1: Restrain the dog if necessary.
Шаг 1а: Approach the dog slowly, speaking in a reassuring tone of voice.
Шаг 1b: Slip a leash around the dog's neck, then place the leash around a fixed object. Pull the dog against this object and tie the leash so the dog cannot move its head.
Шаг 1c: Muzzle the dog to protect yourself, if necessary.
Шаг 2: Clip the hair from the bite area.
Шаг 3: Flush thoroughly by pouring 3% hydrogen peroxide directly on the bite.
Various injuries may cause unconsciousness in a dog. Turn to the next section for tips on what to do in this emergency situation.
Your first priority when dealing with an unconscious dog is to get the heart beating and the dog breathing. Also be sure to watch for signs of shock, which include pale or white gums, a rapid heartbeat, or rapid breathing. Use the following tips to provide proper treatment to a dog that has lost consciousness.
Шаг 1: If you suspect choking, clear the dog's airway. If the dog is not choking, proceed to
Step 2.
Шаг 1а: Open the dog's mouth carefully by grasping the upper jaw with one hand over the muzzle.
Шаг 1b: Press the dog's lips over the upper teeth by pressing your thumb on one side and your fingers on the other so that the lips are between the dog's teeth and your fingers. Apply firm pressure to force the mouth open.
Шаг 1c: If you can see the object, try to remove it with your fingers.
Шаг 1г: If you cannot remove the object and the dog is small enough, pick it up by grasping its back legs; переверните его вверх дном и энергично встряхните. Slapping its back while shaking may help to dislodge the object.
Step 1e: If you cannot remove the object and the dog is too large to pick up, place the dog on its side on the floor. Place your hand just behind the rib cage and press down and slightly forward quickly and firmly. Release. Repeat rapidly several times until the object is expelled.
Step 1f: If you cannot dislodge the object, transport the dog immediately to the veterinarian.
Шаг 2: If the dog is breathing, check for shock. If the dog is not breathing, proceed to Step 3.
Шаг 2а: Examine the gums by gently lifting the upper lip so the gum is visible. Pale or white gums indicate the dog is almost certainly in shock and may have serious internal injuries and/or bleeding. If the gums are pink, the dog is probably not in shock.
Шаг 2b: Determine the heartbeat. Place fingers firmly on the dog about 2 inches behind the dog's elbow in the center of its chest. Count the number of beats in 10 seconds and multiply by 6. If the dog is in shock its heartbeat may be more than 150 beats per minute.
Шаг 2c: Place the dog on its side with its head extended. Gently pull out the dog's tongue to keep the airway open.
Шаг 2г. Elevate the dog's hindquarters slightly by placing them on a pillow or folded towels. To conserve body heat, wrap the dog in a blanket or jacket.
Шаг 2e: Transport the dog immediately to the veterinarian.
Шаг 3: Feel for a heartbeat by placing your fingers about 2 inches behind the dog's elbow in the middle of its chest.

Шаг 4: If the dog's heart is not beating, proceed to Step 5. If it is, perform artificial respiration.
Шаг 4а. Turn the dog on its side.
Шаг 4b: Hold the dog's mouth and lips closed and blow firmly into its nostrils. Administer 1 breath every 3 to 5 seconds. Take a deep breath, and repeat until you feel resistance or see the dog's chest rise.
Шаг 4c: After 10 seconds, stop. Watch the chest for movement to indicate the dog is breathing on its own.
Шаг 4г. If the dog is not breathing, continue artificial respiration.
Шаг 5: If the heart is not beating, perform CPR.
Шаг 5а: Turn the dog on its back.
Шаг 5b: Kneel down at the head of the dog.
Шаг 5c: Clasp your hands over the dog's chest with your palms resting on either side of its chest.
Шаг 5г. Compress your palms on the chest firmly for a count of "2," and release for a count of "1." Moderate pressure is required. Repeat about 60 to 90 times per minute.
Шаг 5e: Alternately (after 30 seconds), hold the dog's mouth and lips closed and blow firmly into its nostrils. Blow for 3 seconds, take a deep breath, and repeat until you feel resistance or see the dog's chest rise. Try to repeat this 10 to 20 times per minute. As a general rule, use a CPR ratio of about 5 heart compressions to 1 breath of air.
Step 5f: After 1 minute, stop. Look at the chest for breathing movement, and feel for a heartbeat by placing your fingers about 2 inches behind the dog's elbow in the center of its chest.
Step 5g: If the dog's heart is not beating, continue CPR. If the heart starts beating, but the dog is still not breathing, return to Step 4.
Шаг 5а: Turn the dog on its side.
Шаг 5b: Place the palm of your hand in the middle of the dog's chest.
Шаг 5c: Press for a count of "2," and release for a count of "1." Firm pressure is required. Repeat about 60 to 90 times per minute.
Шаг 5г. Alternately (after 30 seconds), hold the dog's mouth and lips closed and blow firmly into its nostrils. Blow for 3 seconds, take a deep breath, and repeat until you feel resistance or see the chest rise. Try to repeat this 10 to 20 times per minute.
Шаг 5e: After 1 minute, stop. Look at the chest for breathing movement, and feel for a heartbeat by placing your fingers about 2 inches behind the dog's elbow in the center of its chest.
Step 5f: If the dog's heart is not beating, continue CPR. If the heart starts beating but the dog is still not breathing, return to Step 4.
Шаг 6: Transport the dog immediately to the veterinarian. CPR or artificial respiration should be continued on the way to the veterinarian or until the dog is breathing and its heart is beating without assistance.
Like diarrhea, vomiting is not necessarily a serious problem unless a dog becomes dehydrated. Check the next page for tips on what potential problems to look for.
Vomiting is one of the most commonly encountered problems in veterinary medicine. It is nature's way of permitting the dog to rid its stomach of an irritating substance such as spoiled food.
But not all vomiting is due to simple irritation. More serious causes are viral infections or diseases of the liver, pancreas, or kidney. It is important to seek professional help if there are signs of bleeding or if the dog is depressed and still vomiting after initial efforts at control have failed. Here are some tips for treating a vomiting dog:
Шаг 1: Remove all food and water for at least 12 to 24 hours.
Шаг 2: If vomiting contains blood or is frequent, contact the veterinarian immediately. If not, proceed to Step 3.
Шаг 3: After 12 to 24 hours of no vomiting, introduce water gradually at 1 to 2 ounces at a time. If no vomiting occurs, offer a bland diet of boiled skinless chicken and rice (50:50 mixture). If this is held down, transition to regular diet over the next 2 days by mixing an increasing quantity of regular dog food with bland diet.
Шаг 4: Pepto-Bismol can be safely used for dogs. Call the veterinarian for recommended dose.
A dog giving birth to puppies can be quite an amazing experience -- for both the dog and its owner. Turn to the next page to learn how to be prepared to help a dog if problems occur during the birth process.
A dog's normal length of pregnancy (gestation period) is 61 to 63 days. However, delivery 1 or 2 days earlier or later is not unusual and presents no cause for alarm as long as the general health of the dog is good.
In preparation for whelping, the dog will make a nest with newspapers and rags if they are available. If they are not, she may dig into the carpeting with her front paws, almost as if she were digging a hole. This is termed "nest building" and is a fairly consistent sign that delivery will follow soon, usually within 2 to 3 days. To make your pet feel comfortable about delivering (and to save your carpet!) provide a whelping box with plenty of newspapers and rags.
At about the same time the nest building occurs, you should also notice an enlargement of the breasts with milk production. Another fairly consistent method of determining when the dog will deliver is to take her temperature each day. Approximately 24 hours before delivery, her temperature will drop about 2 degrees Fahrenheit/1 degree Celsius.
When she is getting close to labor, a mucous discharge appears at the vulva followed by a greenish discharge. At no time should there be a brown or foul-smelling discharge. If this is present, contact your veterinarian immediately.
The onset of labor will make the dog somewhat restless, but it is not until the second stage of labor that she will actually lie down and have abdominal contractions. Once the second stage of labor begins, delivery should begin within 3 hours. If no pups are delivered by that time, professional help should be obtained.
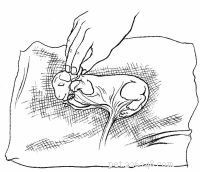
A puppy may be born in one of three ways. The most common presentation is head and feet first. The second most common is rear legs and tail first, not to be confused with a true breech birth. In a true breech only the rump is presented, with the rear legs folded under the body of the puppy. In a small bitch, this type of presentation can cause problems and should be watched for carefully.
Complications may arise during the birthing process that you can handle quite easily by using the tips below.
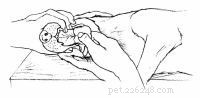
Шаг 1: Grasp the puppy with a clean towel.
Шаг 2: Applying steady traction, gently pull the puppy at a slight downward angle. Continue pulling gently and steadily until the pup is delivered.
Шаг 3: If you are unable to remove the puppy, contact the veterinarian immediately.
Шаг 1: Put the pup, covered in the fetal membrane, on a clean towel.
Шаг 2: Peel the membrane off its face immediately.
Шаг 3: Continue to pull the membrane from its body. The membrane will collect around the umbilical cord. DO NOT pull on the umbilical cord.
Шаг 4: Wipe any fluid off the nostrils and mouth. Rub the puppy's body vigorously with a towel to stimulate breathing.
Шаг 5: If there is heavy mucus in the mouth and nose, clean out what you can with your finger.
Шаг 6: If the puppy is still having trouble breathing:
Шаг 6а: Place the puppy in a towel on the palm of your hand.
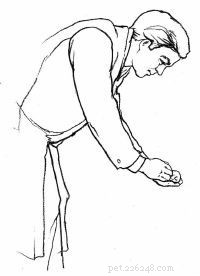
Шаг 6b: Cradle its head by closing your thumb toward your fingers.
Шаг 6c: Using your other hand to secure the puppy, lift your hands to head level and swing firmly down toward the floor. Repeat several times.
Шаг 6г. Vigorously rub the puppy again with the towel.
Шаг 6e: Stop when the puppy is actively moving and crying.
Шаг 7: Tie a thread around the umbilical cord about 1 inch above the puppy's abdomen. Leaving the tied portion attached to the puppy, cut off the rest of the umbilical cord and fetal membrane.
Step 8: Place the puppy with its mother. She will take care of the rest. If she does not take care of the puppies, or if any other problem develops, contact the veterinarian as soon as possible.
Seeing a dog hurt or in distress can be such a helpless feeling. By learning the tips outlined in this article, you can arm yourself with dozens of first-aid techniques that may end up saving the life of your beloved pet.
Публикации Интернэшнл, Лтд.
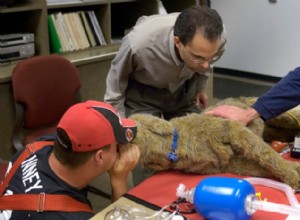
Ветеринар доктор Майк Эстрин (в центре) инструктирует двух пожарных из Нью-Брайтона, Миннесота, как сделать собаке искусственное дыхание с помощью собаки для СЛР. Один имитирует дыхание «изо рта в нос», а другой ощущает, как легкие наполняются воздухом. Это был мой самый страшный кошмар:мой любимый
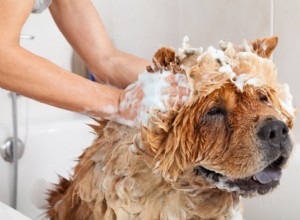
Ваша собака может стать вонючей, если вы не купаете ее достаточно часто, но это не единственная причина, по которой вам нужно купать свою собаку. Купание помогает сохранить шерсть и кожу собаки здоровыми, а ваш питомец — чистым, свободным от грязи и паразитов. Хотя купание собаки может показаться л
